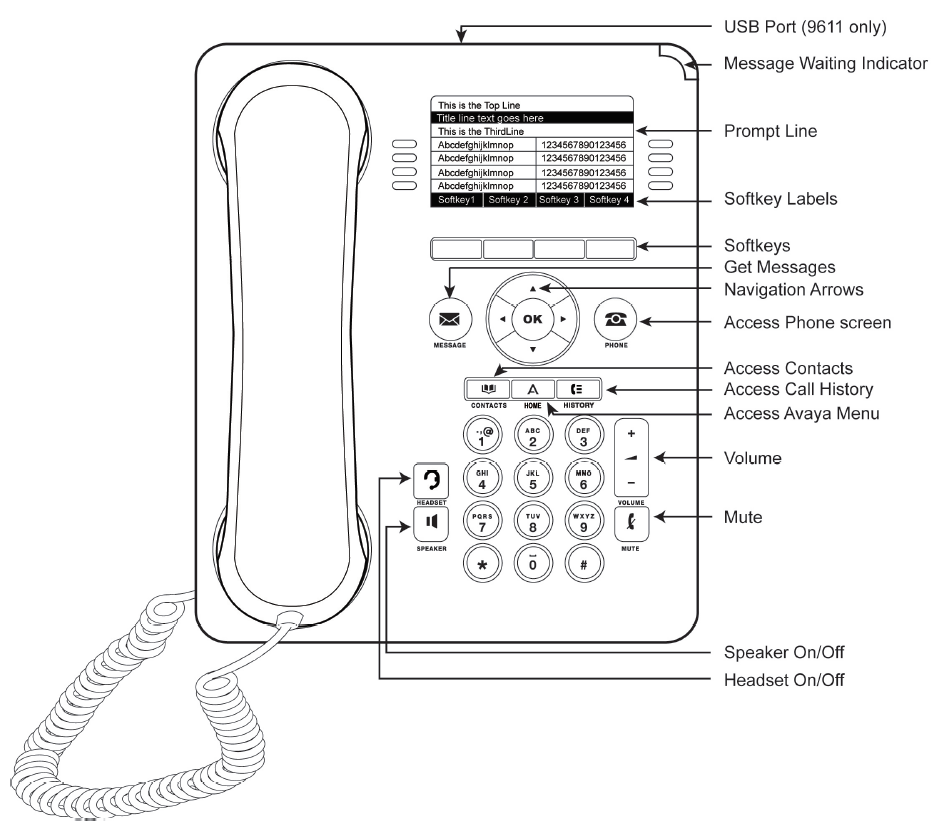
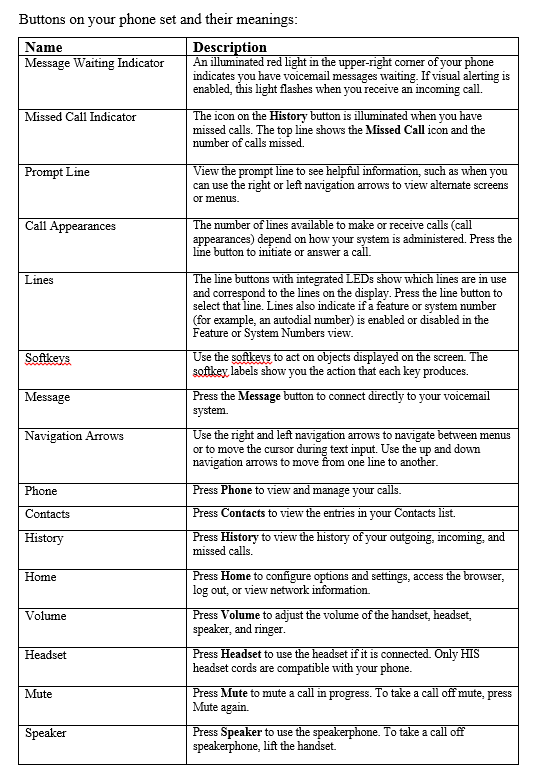
Using your Avaya 9611G Voice Over IP Phone
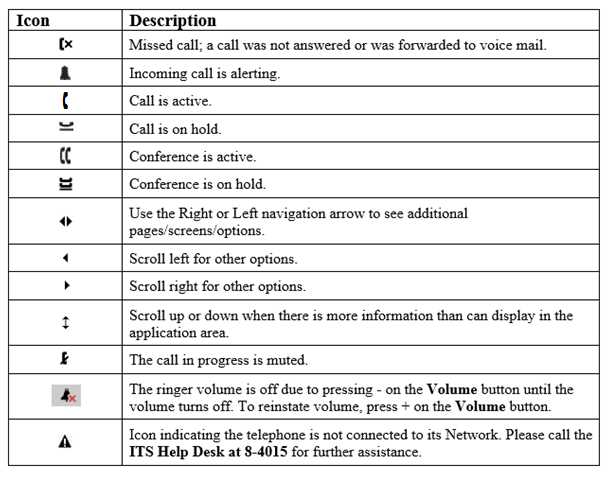
Icons that can appear in the prompt line:
Answering a call
When you receive an incoming call, the incoming call is usually selected automatically. However, if you are already on a call or if you receive more than one incoming call at a time, you may need to select the call you want to answer manually.
Answering an incoming call
If you are not on another call, lift the handset, or press Speaker to answer using the speakerphone, or press Headset to answer using the headset.
If you are on another call, from the Phone screen, scroll to the line with the incoming call and press Answer or OK.
Ignoring an incoming call
Press Ignore to turn off the ringer for an incoming call.
Putting a call on hold
1. Press Phone to view the main Phone screen, if necessary.
2. If you are not active on the line you want to put on hold, select that line.
3. Press Hold.
4. Press Resume or the line button of the held call to retrieve the call. Your system administrator may have administered the Hold Recall feature, which alerts you visually and with a priority ring to remind you of a held call after a certain period of time.
Muting a call
If a call is on mute and you switch between the handset, headset, or speakerphone, the mute will be turned off. When the call is muted, the Mute button light is on and the top line displays the Mute icon.
1. Press Mute during a call so that the other person cannot hear you.
2. Press Mute again to unmute the call.
Transferring a call
1. From the Phone screen, if the call to be transferred is not already active (highlighted), select the line on which the call to be transferred appears.
2. Press Transfer. Dial the telephone number, or call the person from the Contacts list, or call the person from the History list.
3. If unattended transfers have been administered, you can hang up now if you do not want to announce the call. Otherwise, press Complete or OK.
NOTE: Unanswered transfers may be returned to your telephone as a recalled transfer. In this case, you hear a priority ring and see the display message Return next to the call.
Making a call
If you are not on a call, simply dial the number you want to call using the Dialing Instructions provided to you.
1. Lift the handset, or press Speaker or Headset (if applicable) or a line button for an available line.
2. Dial the number you want to call.
Redialing a number
From the Phone screen, press Redial. The last number will be redialed or you will see a list of the most recent numbers that you have dialed, from which you can select one to redial.
NOTE: The last number dialed and redial list are cleared if the Outgoing Call Log is cleared.
If you are working with a redial list, scroll to the number you want to call and press Call or OK. Your system administrator can disable Redial functionality.
Speed dialing
On the Phone screen, press and briefly hold the dialpad key assigned to the person you want to call. Or, if speed dial numbers are assigned to a button module attached to your phone, press the button assigned to the person you want to call.
Calling a person from the contacts list
You can call someone in your Contacts list by touching the name in the list. You can find a name by scrolling to it, or by using the search box. Use the dialpad keys to enter the first few letters of the name and the screen will scroll to the first match in your list.
1. Press the Contacts button.
2. Select the person or number you want to call.
3. Locate the contact you want by starting to type the person's name as it is listed.
For example, if you added John Smith to your Contacts List as “Smith, John” you would start typing his last name rather than his first name. Each time you press then dialpad, the list display shifts to match your input. Alternately, you can scroll up or down to locate the contact.
4. Press Call or OK.
Calling a person from call history
1. Press the History button.
2. Scroll to the left or right to view a separate list of all, un-answered, answered, or outgoing calls.
3. Scroll up or down to select the person or number you want to call.
4. Select the person or number you want to call.
5. Press the Call softkey or the OK button.
Forwarding
You can forward your incoming calls to another number or to voicemail. When the Forward button light is on, one or more of the forwarding features are active. The forwarding features available on your phone depend on the options your system administrator has set.
Send All Calls
When Send All Calls (SAC) is on, your incoming calls go directly to a predefined coverage number, typically your voicemail. Incoming calls ring once at your extension and then go directly to a number which is set by your system administrator. If the SAC feature is administered on your phone, a Send All softkey appears on the Phone screen for idle calls. Pressing Send All turns Send All Calls on. If it is already on, pressing Send All turns it off. You can also turn Send All Calls on or off by using the telephone Features list.
1. From the Phone screen, scroll right to access the Features menu.
2. Select SendAllCalls.
3. Press OK or press the line button on which Send All Calls appears to turn Send All Calls on or off.
Forwarding calls
Several forwarding features may be available so you can set a number to which your calls will be forwarded, or turn off call forwarding if it is already on.
1. From the Phone screen, scroll right to access the Features menu.
2. Select Call Fwd.
3. Enter the number to which you want to forward your calls as the destination, then press Enter or OK. After you enter the forwarding number, you hear a confirmation tone.
4. Press OK to turn the call forwarding feature off if it is already on.
Turning off call forwarding
1. From the Phone screen, scroll right to access the Features menu.
2. Scroll down to the active Call Forward button.
3. Press OK or the line button on which Call Forwarding appears.
When you turn off the Call Forwarding feature, you hear a confirmation tone.
Conference calls
You can use conference calls to speak with up to five people (yourself + five others) in different locations on the same call.
Setting up a conference call
1. From the Phone screen, select your active call.
2. Press Conf.
3. Dial the telephone number, or call the person from the Contacts list, or call the person from the History list.
4. When the person answers, press Join or OK to add the person to the existing call.
5. Press Add and repeat these steps to add another person to the conference call.
6. Press Drop at any time to drop the last person added to the conference call.
Adding a person on hold to a conference call
1. From the Phone screen, select your active call.
2. Press Conf, or Add if you are already in a conference.
3. Select the call on hold that you want to add to the conference.
4. Press Resume to take the call off hold.
5. Press Join or Conf to add the person to the conference call.
Putting a conference call on hold
When you put a conference call on hold, the other parties can still talk to each other.
1. Press Hold during a conference call.
2. Press Resume or OK to resume the conference call.
Dropping the last person added to a conference call
1. From the Phone screen, select your active call.
2. Press Drop.
Contacts
You can save up to 250 names and up to 6 telephone numbers per name. When you press the Contacts button, you are automatically put into Contacts search mode.
Searching for a contact
You can jump to a certain group of letters in your Contacts list by pressing the associated dial pad button. For example, if you press 3, the Contacts list might display entries starting with D, E, F, or 3 depending on how you set up your contacts. With each successive dialpad key press, the Contacts list “drills down” to display matching entries.
NOTE: On hook dialing must be disabled to allow this type of Contact search.
1. Press Contacts.
2. Using the dialpad, start typing the name for which you want to search. Keep in mind how your Contact list is set up. If you set up your contacts as “Last Name, First Name” start typing the letters of the last name. If you have set up your Contacts using a different scheme, type the most likely letter(s) that would match the contact you want to find.
3. Press Call to call the person or More then Edit to edit contact information.
Adding a new contact
You can add up to six numbers for a contact. Selecting "handle" as a type allows you to track the contact's telephone presence, for example, not logged in, logged in, in use, or sending all calls to another number.
1. Press Contacts.
2. Press New.
3. Enter the first and last name using the dialpad.
a. Press the number key that corresponds to the letter or number you want to enter.
b. Until the letter or number is displayed.
c. Pause before entering the next character if the characters are on the same key.
d. To enter a space, press 0.
e. Enter remaining letters or numbers.
f. Press Bksp to delete the last character.
NOTE: If you want to remove a letter, number, space, or symbol that is in the middle of the text you entered, use the left and right navigation arrows to place your cursor after the character you want to remove. Once your cursor is in the correct position, press Bksp to remove the character to the left of the cursor.
4. Select the next field.
5. Enter the telephone number and press Primary if applicable. The primary number is the one that will always display without having to go into contact details.
6. Select the next field.
7. Select the type of number entered (work, mobile, home, handle). If you select handle, provide a value that represents the extension number, an "at" @ symbol, and the company name, for example, 21234@avaya.com. You can then determine the contact's presence based on handle icons that appear next to this person's name/number.
8. If you have another number for this contact, scroll down and repeat Steps 5 - 7. You can add up to five additional numbers for this contact, but you can designate only one number as primary.
9. Press Save or OK.
Editing a contact
1. Press Contacts.
2. Search for and select the contact you want to edit.
3. Press More > Edit.
4. Choose the field you want to edit.
5. Use the dialpad and soft keys to make changes to the contact information.
6. Press Save or OK.
Deleting a contact
1. Press Contacts.
2. Select the contact you want to delete.
3. Press More > Delete.
4. Press Yes to confirm or No to cancel.
Call History
The History screen provides a list of recent calls, with information about call disposition (missed, answered, or outgoing) and with caller name and number (where available), call time, and call duration. Call History also shows bridged calls If you are a member of a call pickup group, any calls you picked up for another person or that you missed and were answered by someone else in your pickup group are shown with a Forwarding icon to allow you to review details of that type of call. When you have one or more missed calls, the History button lights and the Missed Calls icon and the number of missed calls display on the top line.
Viewing call history
1. Press History.
You can go to the top of the list by pressing History again.
2. Scroll to the right or left to view separate lists of answered, outgoing, or missed calls. To see details of other calls, scroll up or down.
3. If you are logging bridged calls as well as your own, bridged call details are identified by either CALL FOR: (calls made to the bridged line) or CALLED FROM: (calls made from the bridged line) preceding the applicable number.
4. Press Back to return to the list view.
Adding an entry from the call history to your contacts list
1. Press History.
2. Select the number you want to add to your Contacts list.
3. Press +Contact.
4. Edit the name and telephone number, if necessary.
5. Press Save.
Removing an entry from call history
1. Press History.
2. Select the number you want to delete.
3. Press More > Delete.
4. Press Delete or OK to confirm, or press Cancel if you do not want to delete it.
Clearing all call history entries
Clearing all entries from the call history deletes all of the entries for the specific list you are viewing. For example, if you are viewing the Outgoing calls list, only outgoing calls are deleted.
1. Press History.
2. Select the list you want to delete.
3. Press Clear All to delete all of the entries in the list you are viewing.
4. Press Yes to confirm.
Turning off call history
You can turn History on or off. If you have bridged call appearances on your phone, you can choose whether or not to include calls to your bridged lines in your call history log.
1. Select Options & Settings or Phone Settings.
2. Select Options & Settings...
3. Press Select or OK.
4. Select Application Settings.
5. Press Select or OK.
6. Select the type of call history logging you want to turn off. To turn off logging your calls, select History. To turn logging of bridged lines on or off, select Log Bridged Calls.
7. Press Change or OK to turn call history logging on or off.
8. Press Save.